> ## Documentation Index
> Fetch the complete documentation index at: https://docs.thunderphone.com/llms.txt
> Use this file to discover all available pages before exploring further.
# Embeddable Voice Widget
> Add a voice AI agent to any website with a few lines of code
The ThunderPhone embeddable voice widget lets your website visitors talk to an AI agent directly from the browser. No phone call required -- users click a button and start a real-time voice conversation powered by ThunderPhone.
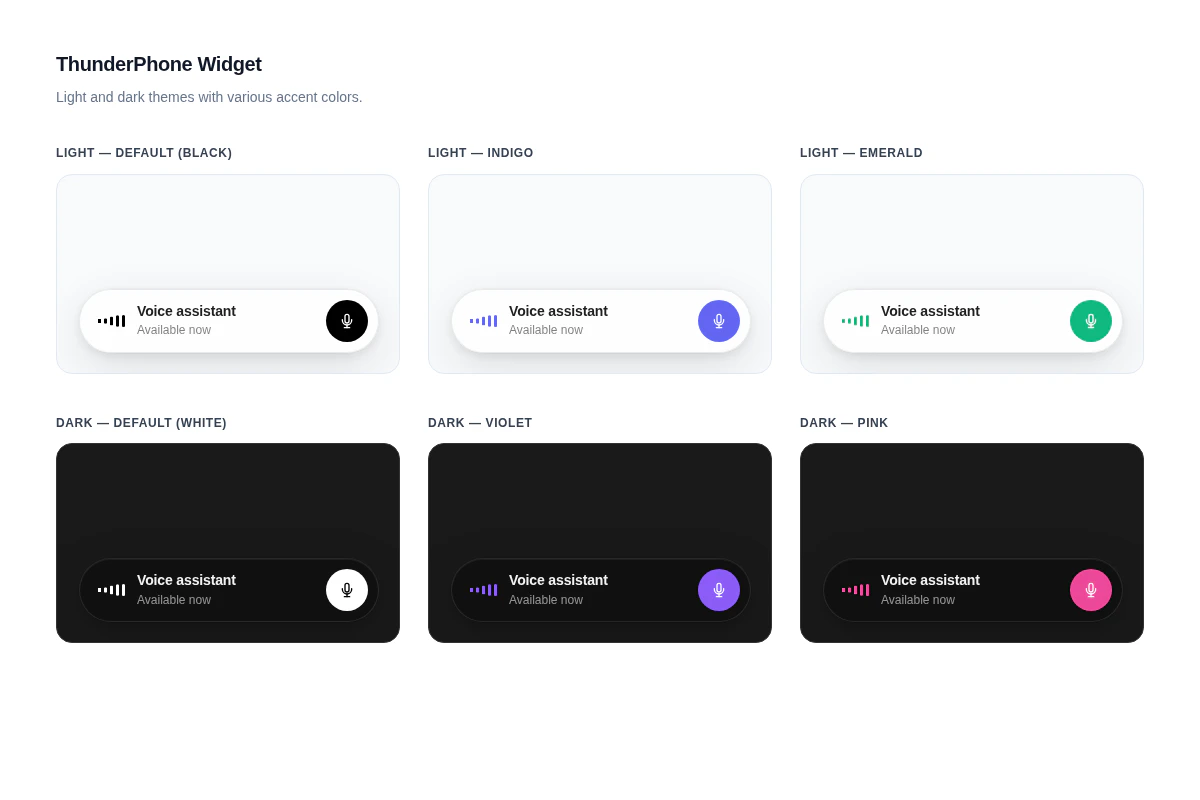
The widget renders as a glassmorphic bar that adapts to light and dark themes, with customizable accent colors and positioning. It is distributed as the `@thunderphone/widget` npm package and is also available via CDN for non-bundler environments.
 ## Prerequisites
Before embedding the widget, complete these three steps in the [ThunderPhone Dashboard](https://app.thunderphone.com):
Go to **Developers** in the dashboard settings and create a publishable key. Publishable keys start with `pk_live_` and are safe to include in client-side code.
In the same Developers settings, add the domains where the widget will be embedded. `localhost` is always allowed for development. Wildcards are supported (e.g., `*.example.com`).
Go to **Web Widgets** in the dashboard and create a widget. Select the agent you want to expose and the publishable key to use. The agent is resolved automatically from your publishable key configuration.
Publishable keys (`pk_live_...`) are **not** the same as your secret API tokens. Publishable keys are designed for client-side use and are scoped to widget sessions on your allowed domains. Never use your secret API token in client-side code.
***
## Quick Start
Install the package:
```bash theme={null}
npm install @thunderphone/widget
```
Drop the widget into your app:
```tsx theme={null}
import { ThunderPhoneWidget } from '@thunderphone/widget'
import '@thunderphone/widget/style.css'
function App() {
return (
)
}
```
That's it. Your users will see a glassmorphic call bar that connects them to your AI agent with a single click.
***
## Customization
The widget has four appearance props:
| Prop | Default | Description |
| -------------- | ---------------------------------------- | ------------------------------------------------------------------------------- |
| `theme` | `'light'` | `'light'` for white glass, `'dark'` for dark glass |
| `primaryColor` | `'#000000'` (light) / `'#ffffff'` (dark) | Accent color for the start button, waveform, and connecting indicator |
| `title` | `'Voice assistant'` | Text displayed in the widget |
| `position` | `'bottom-right'` | Viewport corner: `'bottom-right'`, `'bottom-left'`, `'top-right'`, `'top-left'` |
```tsx Light theme (default) theme={null}
```
```tsx Dark theme with custom color theme={null}
```
Three more props customize the session rather than the look -- all are forwarded to the session request when a call starts:
| Prop | Description |
| ---------- | --------------------------------------------------------------------------------------------- |
| `language` | Per-session language override -- a code or locale such as `en`, `es`, or `fr-FR` |
| `voice` | Per-session voice override -- a voice name such as `maria` |
| `context` | Factual page or site context passed to the agent (truncated server-side to 12,000 characters) |
See the [React component reference](/widget/react) for the full props table.
For a fully custom UI, use the [headless hook](/widget/headless-hook) to manage the voice session while you build your own interface. The hook exposes real-time audio levels for building audio-reactive visualizations.
***
## Integration Options
Choose the integration method that fits your stack:
Pre-built UI component with built-in call controls and status display. Import, pass props, done.
Full control over the UI. The `useThunderPhone` hook manages the voice session while you build your own interface.
No bundler required. Load the widget via a script tag for static sites, WordPress, and other non-React environments.
***
## Styling
The widget ships with built-in light and dark themes controlled by the `theme` prop, and an accent color controlled by the `primaryColor` prop. For deeper customization, you can override CSS custom properties and classes. See the [Styling guide](/widget/styling) for details.
Need help? Contact us at [support@thunderphone.com](mailto:support@thunderphone.com)
## Prerequisites
Before embedding the widget, complete these three steps in the [ThunderPhone Dashboard](https://app.thunderphone.com):
Go to **Developers** in the dashboard settings and create a publishable key. Publishable keys start with `pk_live_` and are safe to include in client-side code.
In the same Developers settings, add the domains where the widget will be embedded. `localhost` is always allowed for development. Wildcards are supported (e.g., `*.example.com`).
Go to **Web Widgets** in the dashboard and create a widget. Select the agent you want to expose and the publishable key to use. The agent is resolved automatically from your publishable key configuration.
Publishable keys (`pk_live_...`) are **not** the same as your secret API tokens. Publishable keys are designed for client-side use and are scoped to widget sessions on your allowed domains. Never use your secret API token in client-side code.
***
## Quick Start
Install the package:
```bash theme={null}
npm install @thunderphone/widget
```
Drop the widget into your app:
```tsx theme={null}
import { ThunderPhoneWidget } from '@thunderphone/widget'
import '@thunderphone/widget/style.css'
function App() {
return (
)
}
```
That's it. Your users will see a glassmorphic call bar that connects them to your AI agent with a single click.
***
## Customization
The widget has four appearance props:
| Prop | Default | Description |
| -------------- | ---------------------------------------- | ------------------------------------------------------------------------------- |
| `theme` | `'light'` | `'light'` for white glass, `'dark'` for dark glass |
| `primaryColor` | `'#000000'` (light) / `'#ffffff'` (dark) | Accent color for the start button, waveform, and connecting indicator |
| `title` | `'Voice assistant'` | Text displayed in the widget |
| `position` | `'bottom-right'` | Viewport corner: `'bottom-right'`, `'bottom-left'`, `'top-right'`, `'top-left'` |
```tsx Light theme (default) theme={null}
```
```tsx Dark theme with custom color theme={null}
```
Three more props customize the session rather than the look -- all are forwarded to the session request when a call starts:
| Prop | Description |
| ---------- | --------------------------------------------------------------------------------------------- |
| `language` | Per-session language override -- a code or locale such as `en`, `es`, or `fr-FR` |
| `voice` | Per-session voice override -- a voice name such as `maria` |
| `context` | Factual page or site context passed to the agent (truncated server-side to 12,000 characters) |
See the [React component reference](/widget/react) for the full props table.
For a fully custom UI, use the [headless hook](/widget/headless-hook) to manage the voice session while you build your own interface. The hook exposes real-time audio levels for building audio-reactive visualizations.
***
## Integration Options
Choose the integration method that fits your stack:
Pre-built UI component with built-in call controls and status display. Import, pass props, done.
Full control over the UI. The `useThunderPhone` hook manages the voice session while you build your own interface.
No bundler required. Load the widget via a script tag for static sites, WordPress, and other non-React environments.
***
## Styling
The widget ships with built-in light and dark themes controlled by the `theme` prop, and an accent color controlled by the `primaryColor` prop. For deeper customization, you can override CSS custom properties and classes. See the [Styling guide](/widget/styling) for details.
Need help? Contact us at [support@thunderphone.com](mailto:support@thunderphone.com)